Sure, we understand that owning a stand-up paddleboard (SUP) can be an adventurous and thrilling experience, but what about the equipment that comes with it?
Specifically, the SUP leash. Now, the question arises: Can I make my DIY SUP leash?
And if so, how? In this article, we will explore the possibility of creating your own SUP leash from scratch, providing you with the step-by-step process to ensure a safe and cost-effective solution. So, get ready to unleash your creativity and join us on this DIY journey!
Materials needed for DIY SUP leash
To make your own DIY SUP leash, you will need several materials. Here is a list of the items you will need:
Cord or rope
The cord or rope will serve as the main component of your DIY leash. It needs to be solid and durable to withstand the tension and pressure of paddleboarding.
Leash plug
The leash plug is the attachment point on your paddleboard where the leash will connect. It is typically located at the rear of the board and provides a secure anchor for the leash.
Swivel
The swivel is an essential component of a SUP leash as it allows freedom of movement without getting tangled. It ensures that the leash does not restrict your paddling strokes and allows you to move comfortably on the water.
Velcro strap
A Velcro strap secures the leash around your ankle or calf. This provides added comfort and security, ensuring the leash stays firmly attached to your body.
Heat shrink tubing
Heat shrink tubing is used to reinforce the connection points and provide added strength to your DIY leash. It can cover the knots and prevent them from coming undone.
Scissors
Scissors will be needed to cut the cord, Velcro strap, and heat shrink tubing to the desired lengths. Make sure to use a pair of sharp scissors to ensure clean cuts.
Lighter
A lighter is required to heat the heat-shrink tubing and make it shrink tightly around the cord and connections. This step is crucial to ensure a secure and robust leash.
Power drill
A power drill is needed to create a hole for the leash plug. Make sure to use the appropriate drill bit size for your chosen plug.
Drill bit
The drill bit is the attachment for the power drill and determines the hole size that will be created. It should be compatible with the leash plug you have selected.
Sandpaper
Sandpaper clears any rough edges on the leash plug hole or other surfaces. This will prevent abrasions or scratches and ensure a clean and secure attachment.
Step-by-step tutorial for making a DIY SUP leash
Now that you have gathered all the necessary materials, let’s walk through the step-by-step process of making your DIY SUP leash.
Preparing the materials
Before assembling the leash, preparing and cutting all the materials to the desired lengths is essential. Measure the cord, Velcro strap, and heat shrink tubing based on your personal preference and the size of your paddleboard.
Attaching the leash plug
To attach the leash plug, first, use the power drill and drill bit to create a hole in your paddleboard’s desired location. Make sure the hole is the appropriate size for the leash plug. Once the hole is drilled, insert the leash plug and secure it.
Creating the swivel attachment point
To create the swivel attachment point, tie a knot at one end of the cord. Then, pass the other end of the cord through the swivel and tie another knot to secure it. The swivel should be able to rotate freely, allowing for smooth movement while paddleboarding.
Attaching the cord to the leash plug
Take the end of the cord without the swivel and thread it through the hole in the leash plug. Tie a secure knot to attach the cord to the plug tightly. You may wrap the knot with heat shrink tubing for added reinforcement.
Adding a Velcro strap for comfort and security
Wrap the Velcro strap around the cord near the leash plug attachment point. Adjust the strap to fit your ankle or calf and secure it tightly. The Velcro strap provides added security, ensuring the leash stays firmly attached to your body.
Using heat shrink tubing for reinforcement
Slide a heat shrink tubing over the knot, connecting the cord to the leash plug. Use the lighter to heat the tubing, causing it to shrink and tightly secure the connection. Repeat this process for any other knots or connection points on the leash.
Trimming and finishing the leash
Trim any excess cord, Velcro strap, or heat shrink tubing to ensure a clean and streamlined leash. Use the scissors to cut the materials neatly, removing frayed ends or uneven edges. This will give your DIY leash a polished and professional look.
Testing the DIY SUP leash
Before heading out onto the water, it is crucial to test the strength and reliability of your DIY SUP leash. Attach the leash to your ankle or calf and give it a firm tug to ensure that all the connections are secure and there is no risk of failure. Being safe and confident in your equipment is always better before embarking on your paddleboarding adventure.
Alternative methods for creating a DIY SUP leash
While the step-by-step tutorial above provides a comprehensive guide for making your own DIY SUP leash, there are alternative methods you can explore based on your preferences and available resources.
Using a bungee cord
Instead of using a traditional cord or rope, you can consider using a bungee cord for your DIY SUP leash. A bungee cord provides added elasticity, allowing greater flexibility and movement while paddleboarding. However, ensuring the bungee cord is strong enough to withstand the tension and pressure experienced during paddleboarding is essential.
Repurposing a leash from another water sport
If you have a leash from another water sport, such as surfing or windsurfing, you can repurpose it for paddleboarding. This can be a cost-effective and convenient option if you already have a leash that meets the requirements for strength and durability. However, assess the leash’s condition and ensure that it is suitable for paddleboarding before using it.
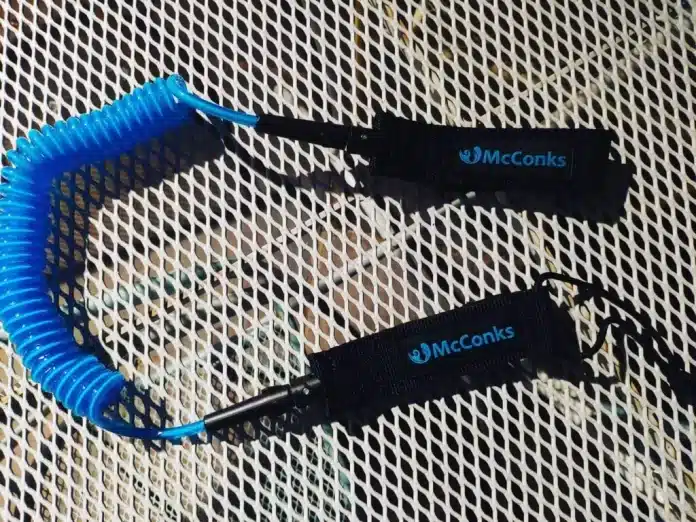
Using a DIY coiled leash design
Another alternative method is to create a DIY coiled leash. A coiled leash is designed to retract and expand, providing greater freedom of movement while still ensuring that the leash is securely attached. This design can be particularly beneficial for paddleboarders who want to minimize the risk of entanglement or dragging the leash in the water.
Safety considerations when making a DIY SUP leash
When making your own DIY SUP leash, it is essential to prioritize safety. Here are some important considerations to keep in mind:
Ensuring the strength and durability of the materials used
Choose high-quality materials that are strong and durable. The leash should withstand the tension, pressure, and potentially rough conditions of paddleboarding. A weak or compromised leash can put you at risk and lead to equipment failure.
Properly secure the leash to your SUP board.
Ensure that the leash plug is securely attached to your paddleboard. Double-check the attachment and make sure it is tight and stable. A loose or improperly secured attachment can result in the leash detaching from the board, potentially causing accidents or injuries.
Testing the leash’s strength before use
Before taking your DIY SUP leash out on the water, thoroughly test its strength and reliability. Please give it a firm tug and assess the connections, knots, and attachments. If anything feels loose, weak, or uncertain, make the necessary adjustments or repairs before heading out. It is always better to be cautious and address potential issues before putting yourself in a vulnerable position on the water.
Advantages of making your own DIY SUP leash
Making your own DIY SUP leash comes with several advantages. Here are some of the benefits you can enjoy:
Cost-effectiveness
Creating your SUP leash can be more cost-effective than purchasing a professionally made leash. By sourcing the materials yourself and assembling the leash at home, you can save money while still ensuring that the leash meets your specific needs.
Customization options
When making your DIY leash, you can customize it to your liking. You can choose the length, thickness, and type of cord or rope that best suits your preferences and paddleboarding style. Additionally, you can personalize the leash’s aesthetics, adding your unique touch.
Sense of accomplishment
A certain sense of accomplishment comes with creating your equipment. Making your DIY SUP leash allows you to take ownership of your gear and feel proud that you crafted it yourself. This can enhance your overall enjoyment of paddleboarding and deepen your connection to the sport.
Tailoring the leash to your specific needs
Each paddleboarder has different preferences and requirements when it comes to their leash. By making your DIY leash, you can customize it to your specific needs. Whether you prefer a longer or shorter leash, a thicker or thinner cord, or additional features like a swivel or Velcro strap, you can tailor the leash to suit your paddleboarding style perfectly.
Disadvantages of making your own DIY SUP leash
While there are advantages to making your own DIY SUP leash, it is also essential to consider the potential disadvantages. Here are some factors to keep in mind:
Potential lack of durability compared to professionally-made leashes
Professionally-made SUP leashes are designed and manufactured with high-quality materials and undergo rigorous testing to ensure durability and reliability. While you can strive to create a strong and durable DIY leash, there is a possibility that it may not match the durability of a commercially produced leash.
The challenge of sourcing high-quality materials
Finding high-quality materials for a DIY leash can be challenging, especially if you are unfamiliar with the necessary specifications or cannot access specialty stores. It may require research, time, and effort to ensure that the materials you choose are suitable for paddleboarding and capable of withstanding the demands of the sport.
Time and effort required
Creating a DIY SUP leash requires time and effort. The process can be time-consuming, from gathering the materials to measuring, cutting, and assembling the components, especially if you are new to DIY projects. It is essential to consider whether the benefits of making your leash outweigh the extra time and effort invested.
Risk of improper assembly leading to leash failure
If the DIY leash is improperly assembled, there is a risk of failure. Poorly tied knots, weak connections, or improper reinforcement can lead to leash detachment or breakage. Following instructions carefully, seeking guidance if needed, and testing the leash thoroughly before relying on it during paddleboarding activities are crucial.
Conclusion
In conclusion, making your own DIY SUP leash can be rewarding for paddleboarders who enjoy DIY projects and want to personalize their equipment. By gathering the necessary materials and following a step-by-step tutorial, you can create a leash that meets your specific needs and preferences.
However, weighing the advantages and disadvantages is essential, prioritizing safety and reliability. Consider the challenges and risks associated with making your leash, and assess whether the benefits outweigh the drawbacks.
Ultimately, deciding to make a DIY SUP leash is personal, and choosing the option that best aligns with your skills, resources, and paddleboarding goals is essential.

